
Box gutter (BG)
|
Command name: BOX_GUTTER |
Space(s): Detailing spaces |
|
Purpose: Inserts a notch at the end of the bottom chord of a truss to accommodate a boxed gutter. |
|
|
Usage: |
|
|
1. Type BG and press Enter. |
|
|
2. Follow prompts to set gutter height and widths. |
|
|
3. Click near the end of a bottom chord*. |
|
|
Additional info: |
|
Code member (CM)
|
Command name: LAYOUT_MANAGER |
Space(s): Detailing spaces |
|
Purpose: Creates (or codes a line as) a truss member (i.e., chord, web, rail). |
|
|
Usage: |
|
|
With a detail sheet in focus: |
|
|
1. Type CM and press Enter. The Code as Truss Member dialog appears. |
|
|
2. Select a member type (Top Chord, Web Chord, etc.) for Material Usage. |
|
|
3. To create the member: Select By Points for Method. |
|
|
To code a line as a member: Select By Entity for Method. |
|
|
4. Click Code As. |
|
|
5. Enter poinrt to create the member or select a line to code it as a member. |
|
Create roof lines (CRL)
|
Command name: ROOF_LINES |
Space(s): Layouts space |
|
Purpose: Creates internal roof lines (e.g., hip, valley, ridge lines) within a specified area where trusses will be generated (using the TD command). Used when creating truss layouts. |
|
|
Usage: |
|
|
With a truss layout border in focus, and the support line and roof line (i.e., eave) coded: |
|
|
1. Type CRL and press Enter. |
|
|
2. Click two points on the roof line to set the roof area. |
|
|
3. Click a third point to set the length of the roof area. |
|
|
4. Follow prompts to select the roof type* for each end of the roof area. |
|
|
Additional Info: |
|
Copy roof (RCR)
|
Command name: ROOF_COPY |
Space(s): Layouts space |
|
Purpose: Copies the coded roof and support lines from a border to the same relative position in a selected border. |
|
|
Usage: |
|
|
1. Focus on a truss layout that has a coded support line and roof line. |
|
|
2. Type RCR and press Enter. |
|
|
3. Select a border. |
|
|
The support and roof lines appear in the selected border. |
|
Code roof line (RL)
|
Command name: TRUSS_RLINE |
Space(s): Layout Space |
|
Purpose: Codes a selected line as a roof line (i.e., eave line). Steelwise uses this line to calculate the eave overhang. Used alongside the SL (TRUSS_LINE) command when creating truss layouts. |
|
|
Usage: |
|
|
With a truss layout border in focus: |
|
|
1. Type RL and press Enter. |
|
|
2. Select line(s) and press Enter. |
|
|
The line type and colour change. NOTE! Segments of a polyline will now be treated as individual coded roof lines. |
|
Roof shape input (RS)
|
Command name: ROOF_SHAPE |
Space(s): Layouts space |
|
Purpose: Generates trusses for a specified pre-set roof shape. Typically used for quick roof generation for demonstration purposes. |
|
|
Usage: |
|
|
With a truss layout border in focus: |
|
|
1. Type RS and press Enter. The Available Shapes dialog appears. |
|
|
2. (Optional) Click Settings to change default settings |
|
|
3. Select a roof shape, enter pitch and eave values, and |
|
|
To generate support and roof lines only: select None or Manual Roof Lines. |
|
|
4. Click Create. The roof shape appears in the truss layout border. |
|
|
5. Enter wall lengths as prompted. |
|
|
|
|
Silent truss builder (-TTD)
|
Command name: -TRUSS_BUILDER |
Space(s): Layouts space; Detailing spaces |
|
Purpose: |
|
|
Usage: |
|
|
To create details sheets automatically (Layouts space): Type -TTD and press Enter. |
|
|
To update engineering for a truss (Detailing space only): |
|
|
1. Focus on a detail sheet for a truss. |
|
|
2. Type -TTD and press Enter. |
|
|
Additional info: |
|
Truss connections (TC)
|
Command name: TRUSSCONNECTIONS |
Space(s): Layouts space |
||||||||||
|
Purpose: Creates a connection (i.e., bracket) plan for a selected truss layout that can be superimposed over the truss layout or placed in a separate border. |
|||||||||||
|
Usage: |
|||||||||||
|
1. Focus on a border with a completed truss layout. |
|||||||||||
|
2. Type TC and press Enter. |
|||||||||||
|
3. Follow prompts (if required) to place the plan in a separate border and/or to set location(s) for drawings of brackets. (See TSET, Options Tab for more info) |
|||||||||||
|
Additional Info:
|
|||||||||||
Truss layout input (TD)
|
Command name: TRUSS_LAYOUT |
Space(s): Layouts space |
|
Purpose: Allows you to generate trusses for a specified roof type to a set area (i.e., a roof block) that correlates to coded support line(s) when creating truss layouts. |
|
|
Usage: |
|
|
With a truss layout border in focus, and relevant lines coded as support (SL) and roof (RL) lines: |
|
|
1. Type TD and press Enter. |
|
|
2. (Optional) Press Enter to change default truss settings (as set in TSET). |
|
|
3. Click two points on a support line to set the width of the roof area (i.e., the main truss span). |
|
|
4. Click a third point to set the length of the roof area. |
|
|
5. Follow prompts to select the roof type for each end of the roof area. |
|
Truss accessories report (TOA)
|
Command name: TRUSS_ACCESSORIES |
Space(s): Layouts space |
|
Purpose: Adds a summary (to a truss layout) of the screws, connectors, battens, etc. (with quantities and dimensions) required for that truss layout. |
|
|
Usage: With a truss layout border in focus, type TOA and press Enter. |
|
Add truss point load (TPL)
|
Command name: TRUSS_POINT |
Space(s): Layouts space, Detailing spaces |
|
Purpose: Adds one or more point loads to trusses in a truss layout or adds one point load to a top or bottom chord in a truss detail sheet. |
|
|
Usage: |
|
|
1. Type TPL and press Enter. A dialog appears. |
|
|
2. Change values (if required) and click Add. |
|
|
3. For one truss (in Layouts): Click a location on a truss and right-click to exit. |
|
Rebuild eaves (TRE)
|
Command name: REBUILD_EAVES |
Space(s): Layouts space |
|
Purpose: Rebuilds the eave (i.e., portion of the truss that extends from the heel to the roof line) on selected truss(es). Typically used after a detailer unintentionally deletes an eave. |
|
|
Usage: |
|
|
1. Type TRE and press Enter. |
|
|
2. Rebuild all eaves: Press Enter |
|
|
Rebuild selected eaves: Select specific truss(es) and press Enter. |
|
Solar panel (TS)
|
Command name: TRUSS_SOLAR |
Space(s): Layouts space |
|
Purpose: Adds a solar panel to a truss layout (and adds point loads to relevant trusses in Detailing spaces when you type TTD). |
|
|
Usage: |
|
|
With a truss layout in focus: |
|
|
1. Type TS and press Enter. |
|
|
2. (Optional) Press Enter to change default solar panel weight, dimensions, and other settings (as set in TSET). |
|
|
3. Select a location in the layout for the solar panel(s). |
|
|
4. Set the orientation so that the panel’s label text is perpendicular to the trusses. |
|
|
5. Press Enter to end the command. |
|
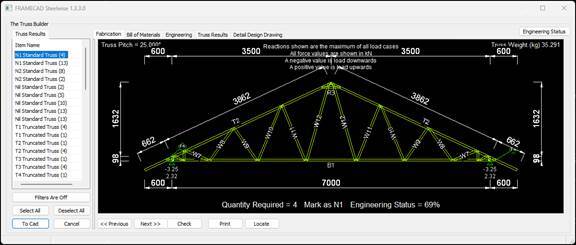
Truss builder (TTD)
|
Command name: TRUSS_BUILDER |
Space(s): Layouts space; Detailing spaces |
||||||||||||
|
Purpose: Opens The Truss Builder dialog to review and/or build trusses (i.e., generate detail sheets) or to update (i.e., amend) a selected truss. Typically used after |
|||||||||||||
|
Usage: |
|||||||||||||
|
To view and build trusses (while in Layouts): |
|||||||||||||
|
1. Type TTD (or focus on a truss layout border and type TTD) and press Enter. The Truss Builder dialog appears. |
|||||||||||||
|
|
|||||||||||||
|
2. (Optional) Click Filters Are On/Filters Are Off and select True for Current View Only to show only trusses from the border currently in focus. |
|||||||||||||
|
3. (Optional) Select an item under Truss Results to view information (scroll for info) about that truss. |
|||||||||||||
|
4. (Optional) double-click an item under Truss Results to make changes via its Truss Editor dialog. |
|||||||||||||
|
Steelwise creates a Detail space with detail sheets for all selected trusses. |
|||||||||||||
|
|
|||||||||||||
|
1. Focus on a detail sheet. |
|||||||||||||
|
2. Type TTD and press Enter. The Truss Builder dialog appears. |
|||||||||||||
|
3. Double-click the item (under Truss Results). The Truss Editor dialog appears. |
|||||||||||||
|
4. Make changes and click Amend or Update as required. |
|||||||||||||
|
Steelwise updates the truss with engineering re-applied. |
|||||||||||||
|
Additional Info:
• Click Previous or Next to manually navigate trusses. • Customers can include an option (via a data file) to allow webs for a specified truss type to extend past the dimple to within a set distance from the edge of the chord. Create a ticket in Communities to request a data file with this option. |
|||||||||||||
Update truss engineering (TUA)
|
Command name: PANEL_UPDATE |
Space(s): Detailing spaces |
|
Purpose: Updates engineering for all trusses in a Detailing space. |
|
|
Usage: In a truss Detailing space (e.g., Truss.1), type TUA and press Enter. |
|
|
Additional info: |
|
Truss uplift plan (TUP)
|
Command name: TRUSS_UPLIFT |
Space(s): Layouts space |
|
Purpose: Creates a copy of a selected truss layout, labels the copy to show the uplift force at each support, and places the copy in an empty border. |
|
|
Usage: |
|
|
1. Focus on a truss layout border. |
|
|
2. Type TUP and press Enter. |
|
|
3. Select an empty border to place the uplift plan. |
|