Operators should run quality control checks when starting production for the day. This helps you identify and correct potential issues with the roll-former. Operators should check stick length, angles of flanges and lips, lip width, dimple height and offset, and surface issues like scratches and scoring.
Note – required tools: engineer’s square, marker, profile drawing, measuring tape, vernier calipers
Run a test stick
Operators should run a test stick from a production job. This allows you to use the test stick for production if it passes quality control checks.
NOTE! Be sure the job matches the current steel and tool configuration.
TIP! FRAMECAD® recommends you produce a lipped profile with dimples at a length of 2400mm (or 8’), a typical stud length.
With the machine in Automatic mode, and a job loaded in Factory2:
- Press
 (Start button).
 - Let the machine produce the first stick in the job, then immediately
 press (Pause button).
Now do your checks.
Check stick length
Measure the stick from end to end. Then in Factory2, tap the stick, then tap Properties > Production. The Stick Length field value should equal the measured length.
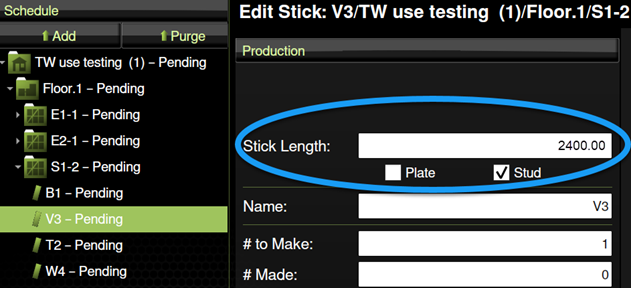
If your measurement = the Stick Length, do the next check.
If your measurement differs the Stick Length by .5mm (13/64”) or more, see Correcting a stick length issue.
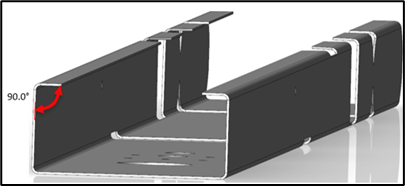
Check flanges and lips are square
Each flange must be square to the web (i.e., at a 90° angle). Each lip must be square to its flange.
Check flanges
Place an engineer’s square against each flange at about 300mm (12”) from the end of the stick. This assures measurement is not affected by the slight flaring that happens at the end of a stick when it is sheared.
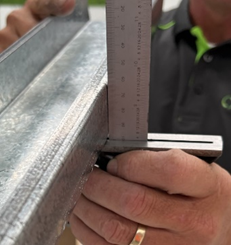
If each flange = 90°, do the next check.
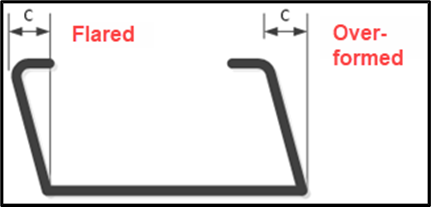
If either flange is flared (angled away from the web) or over-formed (angled toward the web), see Adjusting the flange overform.
Check lips
Visually check lips. If each lip looks like is at a 90° angle to its flange, do the next check.
If either looks flared or over-formed, see Adjusting the lip overform.
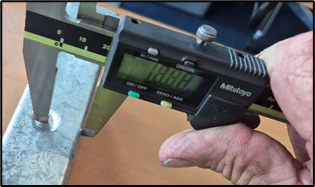
Check lip widths
Place a vernier calliper on each lip at about 300mm (12”) from the end of the stick. This assures measurement is not affected by shearing action.
If the widths are the same, do the next check.
If the widths differ by more than .8mm (1/32”), re-center the steel. See Adjusting the Infeed guides.
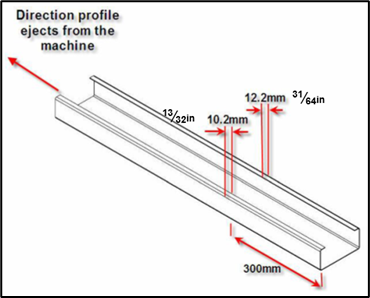
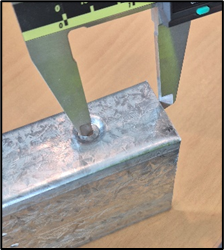
Check dimple height and offset
Dimples must be the correct distance from the web (height) and from the end of the stick (offset). This assures a stick can be fastened correctly when the frame is assembled.
Checking dimple height
Use a vernier caliper to measure the distance from the web to the center of a dimple.
Compare the measured height with the height in the profile drawing.
If your measurement = height in the profile drawing, do the next check.
If your measurement differs from the profile drawing by >.25mm (1/64”), adjust the dimple height. See Adjusting the dimple height.
Checking dimple offset
Use a vernier caliper to measure the distance from the end of the stick to the center of the dimple hole.
Then in Factory2, tap the stick and tap Properties > Tooling. Note the Position value for the first Dimple.
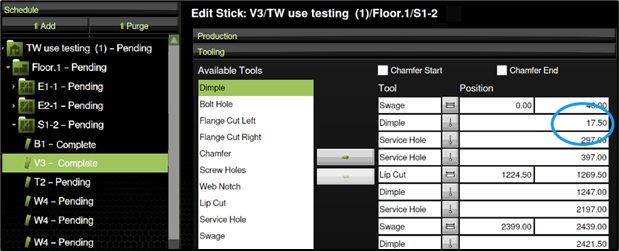
If your measurement = the Position value, do the next check.
If your measurement ≠ the Position value, adjust the dimple tool position. See Troubleshooting an incorrect tool offset.
Checking for bow, scratches, and lubrication
Some production quality issues can be identified by sight or touch. Check for the following:
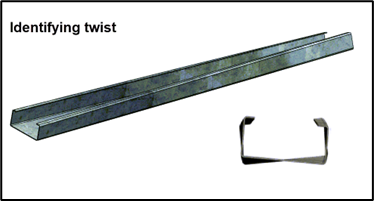
Bow or twist
The stick should be flat, with no lengthwise curve (i.e., bow) or rotational difference between one end of the stick and the other (i.e., twist). Twist, or uphill or downhill bow may indicate force is being applied unevenly to the steel.
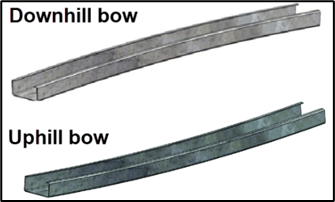
TIP! If you are not sure if a stick has bow, place it back-to-back (web-to-web) with an identical stick. A gap between the centers indicates a downhill bow. A gap between the ends indicates an uphill bow.
See Correcting for bow or twist.
Scratches or scoring
The stick’s web, flange, and lips should be smooth and free of scratches or scoring. See Troubleshooting surface issues.
Lubrication and print quality
The stick should have a wet, even layer of lubrication. A relatively dry stick can result in scratches, damage to the roll-former, or other issues. Excessive lubrication can result in smeared print. Operators may need to adjust the lubrication flow. See Adjusting lubrication.
Printed text should be clear and not faint.