
Add support (AS)
|
Command name: TRUSS_SUPPORT |
Space(s): Detail spaces |
|
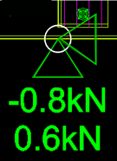
Purpose: Adds a support point to a truss or joist. This is in addition to support points that Steelwise automatically generates (when you type TTD or JJD) based on where the truss or joist intersects with an underlying support line. |
|
|
Usage: |
|
|
1. Type AS and press Enter. |
|
|
2. Click on a location on a member. |
|
|
A support point appears at the selected location (with reactions). |
|
|
|
|
|
Additional info: |
|
Box member (BM)
|
Command name: TRUSS_BOX |
Space(s): Detail spaces |
|
Purpose: |
|
|
Usage: |
|
|
1. Type BM and press Enter. |
|
|
2. (Optional for trusses and joists) Hold Alt to box along the weak (flange) axis. |
|
|
3. To box entire member: Select a member and press Enter. |
|
|
To box a length of a member: Select a start and end point on a member. |
|
|
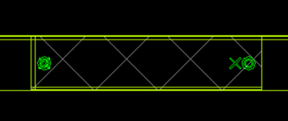
Steelwise updates the member to indicate boxing and updates tooling (if entire member is boxed).
|
|
|
Additional Info: |
|
Copy items (C)
|
Command name: COPY |
Space(s): Layout space; Detail Spaces |
|
Purpose: Copies selected item(s) to specified location(s). |
|
|
Usage: |
|
|
1. Type C and press Enter. |
|
|
2. Select item(s) to copy and press Enter. |
|
|
3. To copy to a single location: Select a base point and displacement point*. |
|
|
To copy to multiple locations: Type O (Mode) and type M (Multiple) to copy from a selected base point to multiple selected displacement points*. |
|
|
4. Press Enter to escape the command. |
|
|
Steelwise copies the item(s) to the specified displacement points (i.e., locations). |
|
|
Additional Info: |
|
Inherit properties (IP)
|
Command name: MEMBER_INHERIT |
Space(s): Layout space; Detail spaces |
|
Purpose: Copies the properties of one item to one or more other items. |
|
|
Usage: |
|
|
1. Type IP and press Enter. |
|
|
2. Select a member to copy its properties. |
|
|
3. Select member(s) that will inherit the copied properties. |
|
Insert web (IW)
|
Command name: TRUSS_ADDWEB |
Space(s): Detail spaces |
|
Purpose: Adds one or more web members (of the same type as existing web members) to a wall panel (i.e., in a webbed head), truss or joist. |
|
|
Usage: |
|
|
For wall panels: |
|
|
1. Type IW and press Enter. |
|
|
2. Select a start point (in a head or a top plate) and end point (in a head or a top plate). |
|
|
Steelwise inserts the web member (with fixings and tooling), relabels web members, and updates the material summary at the top of the detail sheet. Repeat to add another web. |
|
|
For trusses: |
|
|
1. Type IW and press Enter. |
|
|
2. Select a start point (in first chord) and end point (in second chord) for each member to be inserted. |
|
|
3. Press Enter to insert members (automatically spacing two or more members). |
|
|
Steelwise inserts each member (with fixings and tooling), relabels all members, and updates the material summary list at the top of the detail sheet. |
|
|
For joists: |
|
|
1. Type IW and press Enter. |
|
|
2. Type E (entity method) to insert an array of diagonal web members between two selected vertical members. |
|
|
|
|
|
Additional info:
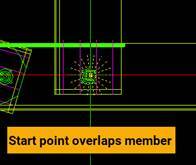
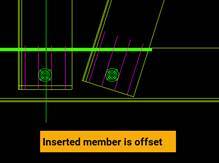
• NOTE! For wall panels – Steelwise automatically inserts a horizontal or vertical member when its start and end points form a near horizontal or near vertical line (i.e., the line’s angle ≤5°). |
|
Move items (M)
|
Command name: MEMBER_MOVE |
Space(s): Layouts space; Detail spaces |
|
Purpose: Moves selected item(s) to a specified location. |
|
|
Usage: |
|
|
1. Type M and press Enter. |
|
|
2. Select item(s) and press Enter. |
|
|
3. Select a base point and displacement point* |
|
|
The item(s) are moved to the specified displacement point (i.e., location). |
|
|
Additional info: |
|
Break member (MB)
|
Command name: MEMBER_BREAK |
Space(s): Layouts space; Detail spaces |
|
Purpose: Shortens multiple items or breaks multiple items into two along a specified break line. Used for editing wall, joist, or truss layouts or for editing panel/frame members in detail sheets. |
|
|
Usage: |
|
|
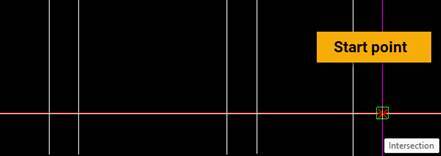
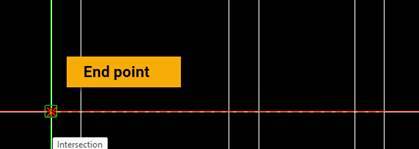
2. Type MB and press Enter. |
|
|
3. Click an item to set a start point and a second item to set an end point. |
|
|
|
|
|
|
|
|
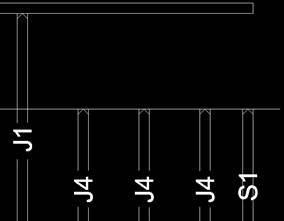
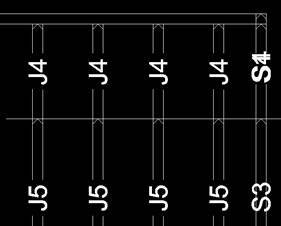
The items are now shortened at the break line or broken in two and relabeled. |
|
|
|
|
|
Additional Info: |
|
Cut member (MC)
|
Command name: MEMBER_CUT |
Space(s): Layouts space; Detail spaces |
|
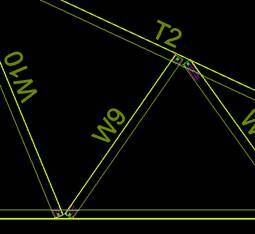
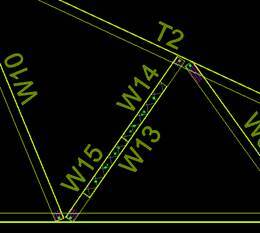
Purpose: Breaks a selected item into two items. Use this command to break a wall panel, joist, or truss in a layout into two, to break a member of a wall panel, truss or joist in a detail sheet into two, or to splice a truss member in a detail sheet. |
|
|
Usage: |
|
|
To break any item into two: |
|
|
1. Type MC and press Enter. |
|
|
2. Click an item. |
|
|
3. Click a location on the item to cut and press Enter. |
|
|
The item is broken into two items joined at the selected cut location. (For detail sheets only) Steelwise relabels all items. |
|
|
To splice a truss member: |
|
|
1. Type MC and press Enter. |
|
|
2. Hold Alt and click a truss member. |
|
|
The member is broken into two joined members. Steelwise automatically boxes the members where they join (if necessary) and relabels the detail sheet. |
|
|
|
|
Divide member (MD)
|
Command name: MEMBER_DIVIDE |
Space(s): Layouts space; Detail space(s) |
|
Purpose: Breaks a selected item into a specified number of segments (of equal length) or into a system-determined number of segments (up to a specified maximum length). |
|
|
Usage: |
|
|
1. Type MD and press Enter. |
|
|
2. Type Q (quantity) to divide into a set number of segments of equal length. |
|
|
or Type D (distance) to divide into any number of segments of up to a set maximum length. |
|
|
3. Select an item. |
|
|
Steelwise divides the items and (in Detail spaces only) updates labelling and material summary. |
|
Extend member (ME)
|
Command name: MEMBER_EXTEND |
Space(s): Layouts space; Detail spaces |
|
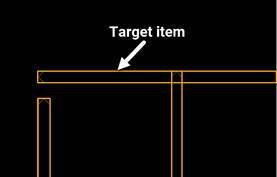
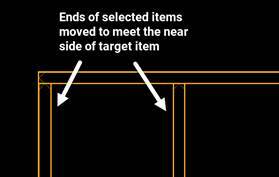
Purpose: Extends or shortens selected item(s) so that their end(s) join a specified side of a target item. |
|
|
Usage: |
|
|
1. Type ME and press Enter. |
|
|
2. Click a target item (for other items to join its near side) |
|
|
or Hold Alt and click a target item (for other items to join its far side). |
|
|
3. Type E (entity selection) to select by clicking item(s) to extend/shorten. |
|
|
Steelwise moves ends of selected items to meet the target item’s near or far side. |
|
|
|
|
Fillet member (MF)
|
Command name: MEMBER_FILLET |
Space(s): Layouts space, |
|
Purpose: Sets how two items join in a corner. Most commonly used to determine which wall panel will have its end join the side of the other wall panel in a corner of a wall layout. |
|
|
Usage: |
|
|
1. Type MF and press Enter. |
|
|
2. Click the item to be joined at its side. |
|
|
3. Click the item to be joined at its end. |
|
Mirror items (MI)
|
Command name: PANEL_MIRROR |
Space(s): Layouts space; Detail spaces |
|
Purpose: Allows you to create a mirror copy of selected item(s). Especially useful for creating layouts for twinned (paired) structures. |
|
|
Usage: |
|
|
1. Type MI and press Enter. |
|
|
2. Select item(s) and press Enter. |
|
|
3. Select a mirror point and place mirrored items. |
|
|
4. Type Y to delete original items or type N to keep original items. |
|
|
Additional Info: |
|
Join member (MJ)
|
Command name: MEMBER_JOIN |
Space(s): Layouts space; Detail space(s) |
|
Purpose: Turns two contiguous items (i.e., items joined at a shared end) into a single item. Use to join wall panels, trusses, or joists in a layout, or to join wall panel, truss or joist members in a detail sheet. |
|
|
Usage: |
|
|
1. Type MJ and press Enter. |
|
|
2. Select two items and press Enter. |
|
Lengthen member (ML)
|
Command name: MEMBER_LENGTHEN |
Space(s): Layouts space; Detail spaces |
|
Purpose: Lengthens or shortens a selected item by a specified amount. |
|
|
Usage: |
|
|
1. Type ML and press Enter. |
|
|
2. Enter a positive or negative amount by which to lengthen or shorten an item. |
|
|
3. Click close to the end of an item to lengthen or shorten. |
|
Offset member (MO)
|
Command name: MEMBER_OFFSET |
Space(s): Layouts space; Detail spaces |
|
Purpose: Copies a selected item to a location offset from (and parallel to) that item by a specified distance. |
|
|
Usage: |
|
|
1. Type MO and press Enter. |
|
|
2. Enter an offset distance*. |
|
|
3. Select an item. |
|
|
4. Select the offset direction. |
|
|
Steelwise places the copy offset from the selected item by the specified distance. |
|
|
Press Esc to exit the command. |
|
Reverse member (MR)
| Command name: PANEL_REVERSE | Space(s): Layouts space |
| Purpose: Changes the direction (i.e., switches the start and end points) of a wall panel, truss or joist. This changes the direction from which the item is viewed in detail sheets. | |
|
Usage: |
|
|
1. Type MR and press Enter. |
|
|
2. Select item(s) and press Enter. |
|
Update member (MU)
|
Command name: MEMBER_UPDATE |
Space(s): Detail space(s) |
|
Purpose: Ensures accurate fixings after editing a wall panel, or truss or joist frame. Adds missing (or removes redundant) fixings/screws from the panel/frame. |
|
|
Usage: |
|
|
1. Focus on the relevant detail sheet. |
|
|
2. Type MU and press Enter. |
|
|
Additional Info: |
|
Trim crossing members (MX)
|
Command name: MEMBER_CROSS |
Space(s): Layouts space; Detail spaces |
|
Purpose: Breaks a selected wall panel, truss, joist or member into segments where it intersects with one or more selected panels/frames or members. |
|
|
Usage: |
|
|
1. Type MX and press Enter. |
|
|
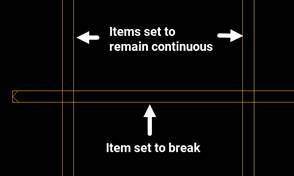
2. Select the item to break, then select intersecting item(s). |
|
|
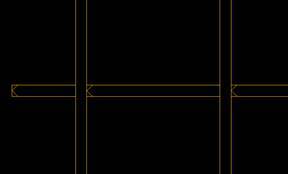
Steelwise turns the item set to break into segments. |
|
|
|
|
|
Press Enter to close the command. |
|
Special erase (SE)
|
Command name: LAYOUT_ERASE |
Space(s): Layouts space; Detail spaces |
|
Purpose: Deletes all or selected wall studs, trusses, or joists (from their respective layouts) or selected member(s) (from a detail sheet). |
|
|
Usage: |
|
|
Focus on a border with a layout or on a detail sheet in a Detail space, then: |
|
|
1. Type SE and press Enter. |
|
|
2. Select item(s) to delete and press Enter. |
|
|
or (Layouts space only) press Enter to delete all applicable items. |
|
|
Additional info: |
|
Strip property intelligence (STRIP)
|
Command name: STRIP |
Space(s): Layouts space; Detail spaces |
|
Purpose: |
|
|
Usage: |
|
|
1. Type STRIP and press Enter. |
|
|
2. Select item(s) and press Enter. |
|
|
Additional Info: |
|