Start a new project by configuring the job file to work with specific material and machine(s) and setting up borders.
Create a file
Press Ctrl + N to create a new file.
CAUTION! Never start a project in Steelwise from a third-party's DWG or DXF file.
Opening a Structure file
Steelwise prompts you to upgrade when you open a file that was created in FRAMECAD® Structure. Click Upgrade to work on the file.
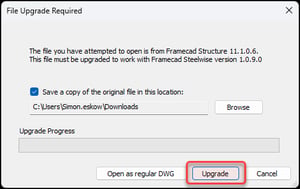
NOTE! Only files created in Structure v9.2.5.0 or later can be upgraded as a Steelwise job file. Files created in versions earlier than Structure v9.2.5.0 may require re-engineering.
Saving and autosaving a file
Save as soon as possible. Steelwise autosaves every 15 minutes after the first manual save.
TIP! Save every few minutes to avoid loss of work.
Configure the file for specific material and machines
Configure the job file for the specific material and machines (roll-formers) that will be used to make the wall, truss, joist, and non-structural (Smart Panel) panel/frame members.
| 1. Type MACHINE_CONFIG and press Enter. A dialog appears. |
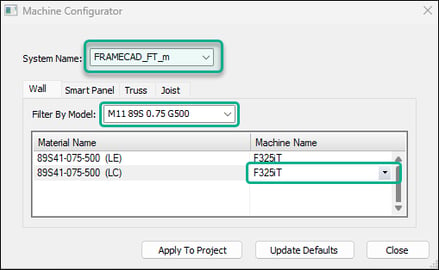 |
| 2. Select a System Name (i.e., data file with the machine, profile, gauge, and rules configurations). |
| 3. In each tab, select the material and roll-former that will be used to make the frame type. |
| 4. Click Apply to Project to save. Confirm selections as prompted. |
Set up borders
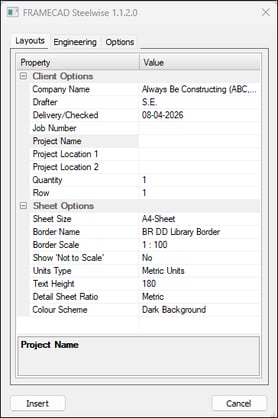
Run the border setup command to set design codes, initialize the job file, and add borders (i.e., drawing sheets) to the Layouts space. Borders can be used as structural layout drawings.
| 1. Type BSET and press Enter. A dialog appears. | |
 |
|
| 2. Check or update common settings in the Layouts tab (see complete BSET settings): | |
| • Enter Company Name, Drafter, and other info to include in borders. | |
| • Set the Quantity of borders* (27 max) to appear over a number of Rows in Layouts. | |
| • Set Sheet Size and Border Scale. | |
| • Select Units Type (imperial or metric). This cannot be changed later. | |
| 3. Check or enter these common settings in the Engineering tab: | |
| • Select a Loading Design Code, Steel Design Code, and Loading Earthquake Code. | |
| • Select a Wind Speed code or enter a specific wind speed and pressure. | |
| 4. Click Insert to save. Steelwise focuses on the first border. | |
|
|

*TIP! Set Quantity to have one border each for a wall layout for each level, each joist layout, a slab/foundation plan, a truss layout, a truss uplift plan, and one for construction details.
About border numbering and navigation
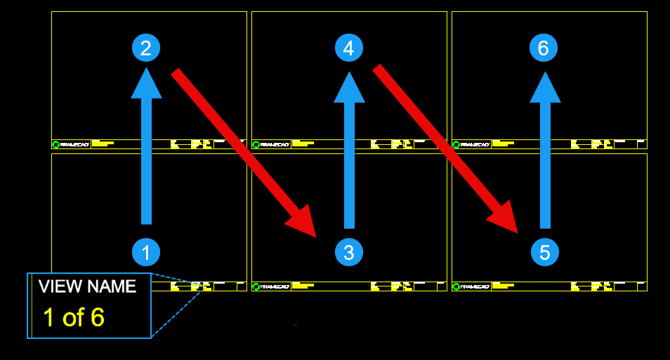
Steelwise shows the border's number under VIEW NAME. Steelwise arranges borders sequentially from the bottom to the top of each column starting from the left.
Focusing on a border
Focusing centers a border in the screen. This is a prerequisite for some commands.
| 1. Type V and press Enter. |
| 2. Type the border's number and press Enter. |
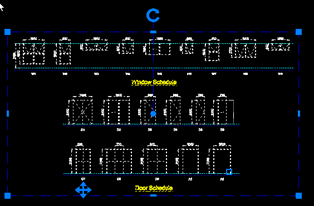
Copy architect's plans into a job file
Detailers often use architects' plans for detailing panels and for design information, such as window schedules. To incorporate architectures' plans into your job file:
| 1. Open the source file in Steelwise. (Click Open as regular DWG if prompted.) |
| 2. Select drawings to copy and press Ctrl + C. |
| 3. Go to Layouts in your job file and press Ctrl + V outside of borders. |
Group architect's plans as blocks
Grouping plans as blocks makes it easier to move them around the Layouts space as needed without losing information. In Layouts:
| 1. Type WBLOCK and press Enter. A dialog appears. |
 |
|
2. Click Select Entities. The Layouts space appears. Select plans and press Enter. |
| 3. The dialog reappears. Select Convert to block, set a file name and path, select a unit for Insert Units. |
|
4. Click OK. The block is now saved as its own file and appears in layouts as a block. |