Operators must do maintenance and preparation before powering up a machine for the day. FRAMECAD recommends operators prepare a machine in the following order.
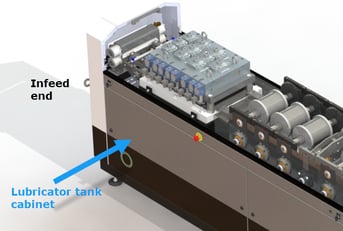
Check and fill the steel lubricator tank
With the machine Isolation switch OFF:
-
Use the cabinet key to unlock the lubricator tank panel (Infeed end, right side).
-
Remove panel. Lift and shake tank.
 If empty or near empty, fill tank with mix of water and lubricant. Tank holds 20L (≈5.2 gallons).
NOTE! Always follow manufacturer’s specifications when mixing lubricant.
-
Replace cabinet panel.
Lubricate the toolblock
With the machine Isolation switch OFF:
- Open the sliding cover (Infeed end).
- Spray white lithium grease OR squirt light grade engine oil from an oil can under the toolblock/through the access holes (depending on specific model).

- Close sliding cover.
Lubricate the shear blade
Lubricate the shear blade before start of production AND four more times through the day
NOTE! Always brush or blow steel dust on and around shear before lubricating.
- Open the sliding cover (Outfeed end).
- Locate the lubricating points on the shear tool top plate.
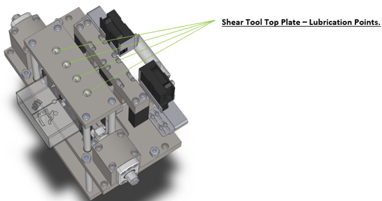
- Squirt 3 to 4 drops of light grade engine oil into each point, then close sliding cover.
Check the hydraulic oil level
Locate the hydraulic reservoir sight glass (left side, center cabinet). You will see a combination thermometer/hydraulic level gauge.
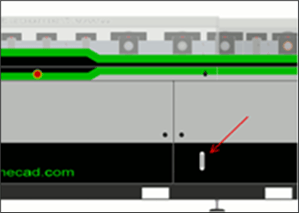
The hydraulic level should read 80 litres (21gal).
TIP: The hydraulic oil level will not change under normal conditions. A drop in the hydraulic oil level will be accompanied by signs of leaking or insufficient punch operation during production.
NOTE! Do not use the machine if hydraulic oil level is under 80 litres (21gal). Contact FRAMECAD for support.
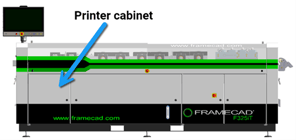
Prepare printer for daily use (cartridge system)
Operators using a roll-former with a cartridge printer system (e.g., Evolution printer) must insert a cartridge in each printer head before powering up for the day.
Click here if you are using a roll-former with a bottle-based printer system.
TIP: FRAMECAD ships roll-formers with cartridges stored in the roll-former printer cabinet.
With the Isolation switch Off:
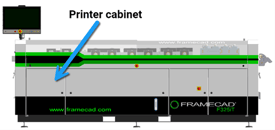
- Open the printer cabinet (left side, Outfeed end)
- Select two cartridges and carefully remove the protective cover from each.
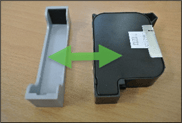
NOTE! If a cartridge is new or from long-term storage, remove its protective film. FRAMECAD recommends storing protective films for reuse. - Open the sliding cover (Outfeed end) and locate the printer heads.
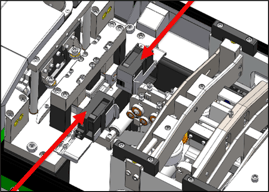
- Release the locking lever on a printer head, insert a cartridge into the gap, then push the cartridge in and down.
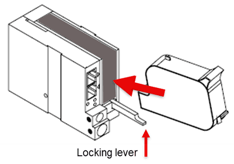
- Gently lift and press the locking lever to snap the cartridge into place.
Repeat steps 4 and 5 for the second cartridge, protective covers to cabinet, and close cabinet door.
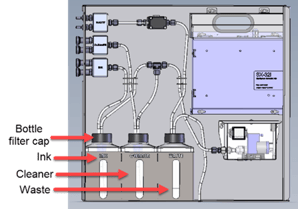
Prepare printer for daily use (bottle system)
Operators using a roll-former with a bottle-based printer system (e.g., Matthews printer) must check there is enough ink and cleaner for the production day, and that the waste bottle is empty enough to contain waste fluids.
Click if your roll-former has a cartridge-based printer system.
CAUTION! Ink, cleaner, and waste fluids in bottles are highly flammable and under pressure. Always wear nitrile gloves and safety glasses when handling fluids or bottles. Always consult supplier Material Safety Data Sheets before use.
With the machine Isolation switch OFF:
- Open the printer cabinet (left side, Outfeed end).
- Visually check bottle fluid levels. If ink or cleaner are near empty, replace bottle. If there is any waste fluid, empty bottle. See below for replacing/emptying bottles.
- If bottle levels are ok, close printer cabinet door.
NOTE! Remember to check pressure and purge print heads with ink after power up.
Replacing ink and cleaner bottles and emptying waste bottles
Operators working with bottle printer systems must replace and empty bottles on a regular basis.
TIP: FRAMECAD ships roll-formers with replacement bottles stored in the roll-former printer cabinet.
TIP: Havea clean rag and spare bottle cap ready to contain leftover fluid.
To replace or empty a bottle:
- Slowly unscrew the bottle filter cap to relieve pressure.
- Carefully remove the bottle. Wipe leftover fluid with a clean rag. Screw a spare top on the bottle to prevent accidental spillage.
- Insert the replacement bottle and screw the bottle filter cap on.
NOTE for new ink or cleaner bottles! DO NOT PEEL the seal off a new bottle. Carefully cut an X into the seal to remove it. Avoid cutting edges with knife.
NOTE for waste bottles! Dispose of waste fluid according to your company’s hazardous materials handling policy.
NOTE! Remember to check print pressure and purge print heads with ink after powering up for the day