A project in FRAMECAD® Nexa represents the design and the specific steel used at a particular time, enabling accurate usage and compliance tracking.
Nexa allows you to trace every steel member or section that you use in a project to its origin, which is critical for enhanced production management and reporting, and safety and quality assurance.
Regulators in some jurisdictions may require builders and frame manufacturers to show a mill manufacturing certificate for any piece of steel used in a building on demand.
When to create project in Nexa
You should create a new project each time you produce a design. This ensures that each steel member is uniquely traceable. Here are examples of when to create new designs:
| When you are... | You can... |
| Reusing a warehouse design for a different client | Create 1 new project |
| Building 5 units at one site with the same design | Create 5 new projects |
| Adding a bathroom last-minute to a house with an existing Nexa project | Use existing project and manage duplicates |
How to create a new project in Nexa
Look for the plus sign in the bottom right corner of the Projects page. For Nexa Base users, click New Project. (Nexa Base users can add up to five projects.) For paid subscription users, click Add Projects, then select New Project.

A New Project page appears. Select an existing company name or enter a new company name and country to create a new customer record from this project. Enter other company details and notes, as needed.

Select an existing contact name, or enter a first and last name to create a new customer contact. Enter other details as needed. Click Next.

On the next page, enter a project title and select a country. Enter other details as needed.

Upload the project's .rfy, .csv, or .nexa design files, if available.

You can add design files any time after you create a project by uploading it to the project in Nexa or by connecting to Nexa from FRAMECAD Steelwise or FRAMECAD Detailer.
Finally, assign the project to a Nexa Admin user. Then click Save.

Users with paid subscriptions have additional options for assigning a workflow, setting project quantity, or saving a project as a template.
Setting a project quantity
Use project quantity when using the same design repeatedly, such as in a residential development where some identical houses will be constructed.


Assigning a workflow
Users with a Nexa Enterprise subscription can assign any workflows created for their account to a project or template. Workflows allow Admin users to track the progress of stacks and panels through a project's stages, according to the project's specific operational needs.
Click the Workflows edit icon, select workflow(s) to use, finish other settings, then save the project or template.

Saving a project as a template
Users with any paid subscription have the option to save a project as a template.
Templates save time, eliminate repetitive data entry, and reduce risk of error when you want to create many related projects based on similar designs. For example, you can use a template for a residential development with multiple houses with similar designs.
Click Template under Save As, then click Continue.

The template page appears. You can use this page to create a project based on that template.
Templates do not appear in the Projects grid. To find a template, in the Projects page, click Add Projects and select Use a template. Click for more information on how to use project templates.
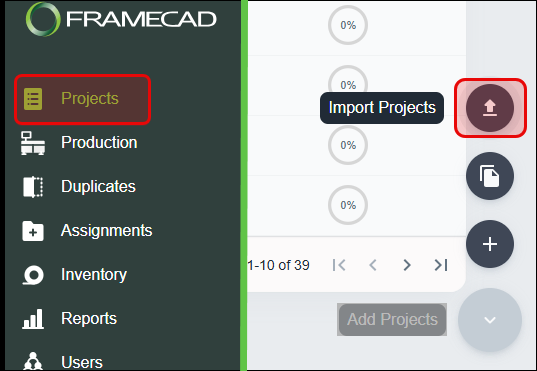
Creating multiple projects in bulk from an imported file
Users with any paid subscription can create multiple projects at once from imported files. This saves time and reduces repetitive data entry when you already have data for lots of projects stored in a spreadsheet, for example. You can import projects from .xlsx, .xls, .csv, or .pdf files.
A customer record must already exist in Nexa for any project you import from a file. Click to learn how to create customer records.
To create multiple projects in bulk, click Add Projects in the lower right corner of the Projects page, then select Import Projects.
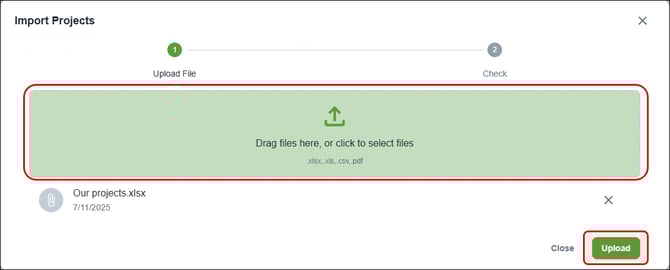
The Import Projects dialog appears. In the upload section (![]() ), drag in files or click to select the files you want to add. The added files appear beneath the upload section. (If you add a file by mistake, you can click its X icon to remove it.)
), drag in files or click to select the files you want to add. The added files appear beneath the upload section. (If you add a file by mistake, you can click its X icon to remove it.)
Click Upload to import projects from the added file(s).
Nexa will process the data from your files.
After Nexa processes the files, the Import customers dialog displays the companies and contacts that you can import.